Best Flushing Practices for Reprocessing Scopes

Properly reprocessing flexible and rigid endoscopes is a critical element of the healthcare infection control process, and following best practices is pivotal. Scott R. Lucas, PhD, PE, program manager, engineering, of ECRI Institute’s AFI Group says, “Hospitals should be diligent in addressing risks related to endoscope reprocessing before a contamination—or even worse, a patient infection—occurs.” In 2010, the ECRI Institute named cross contamination from flexible endoscopes as the top medical technology hazards.

Flexible endoscopy, while common, is subject to high infection control risk. Infection can occur in three ways:1

  • Patient to patient
  • Environment to patient
  • Organisms within the patient’s body


Clinical studies have found reusable endoscope infection risk to be linked to micro-organisms clinging to endoscope biomaterial surfaces. The process forms biofilms that often remain wet after processing and lead to a contamination risk.“The formation of endoscopic biofilm during clinical practice can be related to reuse of detergent, manual cleaning, and incomplete drying of processed endoscopes. Developed biofilms protect the micro-organisms from exposure to detergents and germicides, which increase the likelihood of survival through a decontamination process.”2

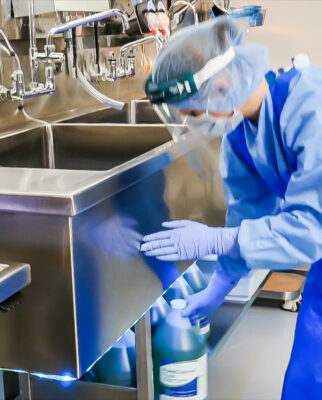
Following the guidelines and the manufacturer’s instructions for use (IFU) during pre-cleaning of the scope is important. This process will remove most of the bioburden after the procedure. Thorough flushing and brushing before any disinfection procedure is necessary to complete the job.

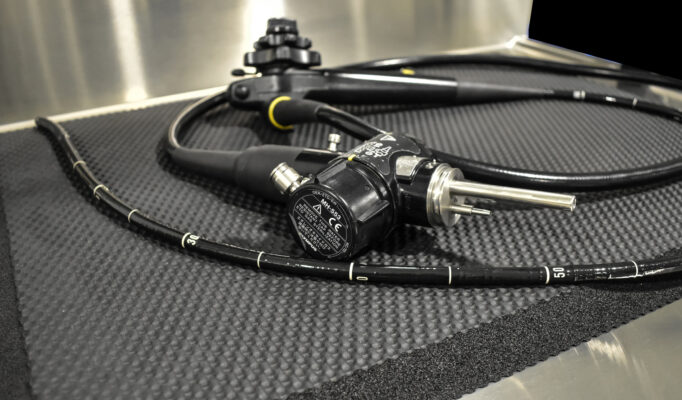
It’s a task that your reprocessing department performs often, considering that a single scope averages 300 to 1,200 uses per year. 

Many departments have slightly different manual cleaning protocols for flushing because the differences in flexible and rigid scopes. It is, however, one of the most critical steps to ensure complete removal of bioburden prior to high level disinfection. It’s helpful if your department has one manual cleaning tool that can meet IFUs for your full scope inventory.


Reducing infection risks with proper scope cleaning protocols

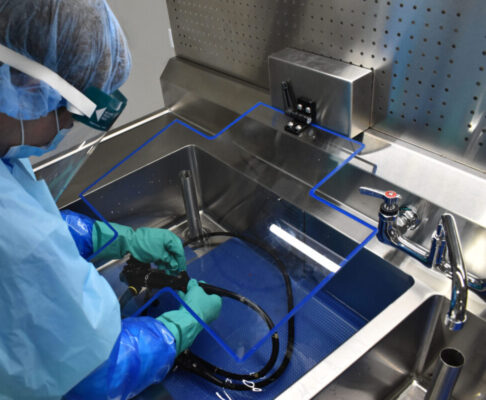
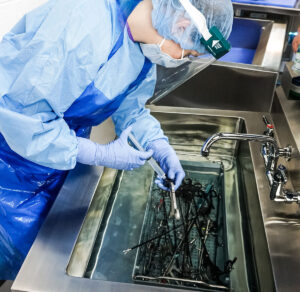
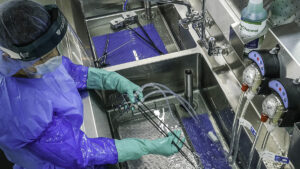
Rigid and flexible endoscopes should be wiped down immediately after use and kept moist. Then the scopes are placed in an enzymatic detergent solution.During manual cleaning, a nurse should brush and aspirate all channels, flushing the channels with detergent.

Perform these steps even on channels not used during the endoscopic procedure. Clean removable parts separately.

Manual cleaning should include brushing and flushing channels and ports according to the manufacturer’s IFU. Using warm tap water for deep cleaning and a disinfectant-detergent solution is standard. Be sure to flush away all disinfectants after cleaning, as they can cause deterioration to delicate instrumentation over time. These areas can become susceptible to hidden microorganisms and pathogens that can infect the next patient. Staff must handle endoscopes with care to avoid excessive coiling, twisting or buckling.

A scope in a reprocessing sink basin with in-basin lighting turned on.

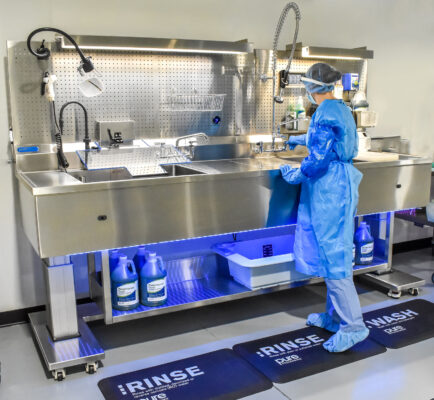
Cleaning will require multiple steps and use up to two sinks (preferably three):

  • Sink 1: Soak in cleaning solution
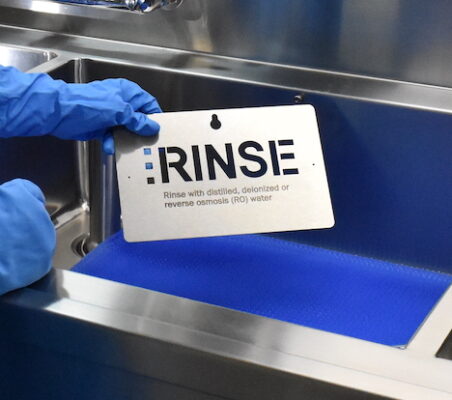
  • Sink 2: Rinse
  • Sink 3: Treated water rinse


Determining the best endoscope flushing solution for your department

Staff must be as efficient as possible to process a high volume of endoscopes. Staff must also be meticulous in performing scope processing tasks to ensure compliance to cleaning protocols. That’s when having one solution to manually clean different types of scopes and meets compliance, makes a difference. The manual cleaning steps prior to high level disinfection must be thorough and meet IFU and guidelines.


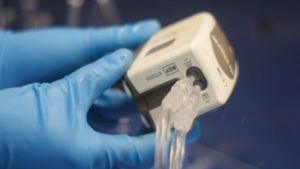
If you don’t have a good endoscope flushing pump in your department, look for these features:

  • Works with flexible and rigid scopes
  • Has the proper adapters for flexible and rigid scopes
  • Reduces exposure to chemicals
  • Reduces ergonomic impacts to technicians
  • Offers an automatic flushing option to run independently
  • A pressure relief valve to protect delicate scope channels is compatible with multiple scope channel diameters and sizes
  • Can flush cleaning and rinse solutions


Identifying a solution to best fit your department needs, follow IFU, and protect staff from injury is ideal. A proper manual cleaning flushing device should do all of the above and can enable your team to manage a high volume of endoscope processing while achieving staff and, ultimately, patient safety.


Learn more about the FlexiPump’s endoscopic cleaning capabilities, how it can improve staff ergonomics, and automate manual flushing.

Have a problem you’d like help tackling? Let us know!

Would you like to earn free CE’s? Read these related endoscopy blogs and take the quizzes for 0.5 CE each!

Endoscope Manual Cleaning: The Challenges that Impact Our Effectiveness

4 Process Trends in GI and SPD & What You Need to Know

References:

  1. Crowson, Carol (2000). Cleaning and disinfecting flexible endoscopes. Nursing Times.
    Vol: 96, issue: 38.
  2. Omidbakhsh, N. et al (2021). Flexible gastrointestinal endoscope processing challenges, current issues and future perspectives. The Journal of Hospital Infection. Volume 110, P133-138, April 01, 2021.
  3. ANSI/AAMI ST91:2021: ANSI AAMI ST91 | Flexible and semi-rigid endoscope processing | AAMI
  4. ANSI/AAMI ST79:2017: ANSI AAMI ST79 2017 | AAMI 

3 Outcomes of Efficiently Designed Prep and Pack Workspaces

Packaging and assembly in central sterile processing departments are necessary to ensure sterility of instruments that will be used on the next patient. During that process, technicians are responsible for inspection, assembly, and packaging of instruments in preparation for sterilization. It is a critical step that requires acute attention to detail. Efficiently designed prep and pack workspaces lead to benefits not only for your team, but patient safety.


1. Employees can be more actively engaged in tasks


Visual inspection of instruments following the decontamination process is vitally important to ensure removal of any residual debris or instrument damage. To achieve adequate visual inspection, departments must be outfitted with equipment to assist technicians with performing their tasks.


Visual inspection according to ANSI/AAMI ST79:2017, Annex D, Verification of cleaning processes involves “the use of a lighted magnifying glass for inspecting cleanliness of device surfaces or the use of borescope cameras for inspecting the internal channels of lumened instruments. Health care personnel inspect every device for visible organic soil and contamination in a simple functionality check, usually as part of the inspection, preparation, and packaging procedure.”


When employees are outfitted with tools such as sufficient overhead lighting, magnified task lights and borescopes, they are able to effectively perform their job and can do so without visual strain.


2. Ergonomic considerations improve employee safety


Trays full of decontaminated instruments that are packaged for the next surgical procedure can become an ergonomic injury risk. A major orthopedic case can take 30 instrument trays, some weighing as much as 40 pounds.1  Lifting trays creates distress on technicians’ musculoskeletal system. When compounded with the twisting and lifting of trays onto a packaging and assembly table, your staff are at risk for added injuries.

One way to avoid ergonomic injuries is to design a workspace that incorporates the needs of the user. Height-adjustable prep and pack tables help technicians by allowing them to adjust the table height to their needs and tasks. Packaging and assembly require the technician to carefully sort and place instruments into trays. This process can become tedious and painful when the prep and pack table is either too high or too short for the technician. Add the inability to properly reach the supplies needed to prepare the tray for packaging, and you create even more strain. That’s where pegboards attached to height-adjustable tables help users not only perform their duty with more ease, but do so with more attention to detail and efficiency, without the burden of bodily pain.


3. Design helps meet patient safety goals


Once instruments are inspected and sorted and placed into trays, packaging of the instruments creates a protective barrier to ensure sterility between the sterilization process and when those instruments are used on the next patient. Any irregularities or punctures in sterile wrap put the patient at risk for a healthcare acquired infection (HAI) by allowing contaminants to enter through the sterile wrap. To avoid this scenario, ANSI/AAMI ST79:2017, 9.1 standards state that “…sterile processing personnel should …inspect wraps before each use for holes, worn spots, and stains. …to ensure that it is free of defects that could have an adverse effect on the performance of the material.”


HSPA’s Central Service Technician Manual recommends that woven fabrics “…must be inspected to ensure that there are no tears, punctures, worn spots or stains from previous use. That inspection is performed using a light table that has a light source built into the tabletop to help spot small holes and punctures. As the wrap is passed over the lighted table top, light shines through the small holes and punctures making them easier to identify.”


To ensure that sterile wrap materials are properly inspected through the use of a tabletop light, departments must design their packaging and assembly areas with tables that allow for these recommendations and standards to be met. A prep and pack table with a built-in light allows for the exceptional inspection of sterile wrap and therefore leads to sterility assurance and improved patient safety.


Your staff are your most valuable assets. By ensuring they are able to perform their duties without injury and strain and can do so with attention to detail, patient safety is improved.


Learn more about packaging and assembly tables, such as the PureSteel Ergonomic Workstation, that can meet or exceed standards and recommendations.


Does your department have a challenge regarding prep & pack design? We’d love to help you solve it.

References:

  1. https://www.ormanager.com/wp-content/uploads/pdfx/ORMVol24No2instrumentSetsShedPounds.pdf
  2. https://webstore.ansi.org/standards/aami/ansiaamist792006?gclid=CjwKCAjw87SHBhBiEiwAukSeUSiu2D6jYVWFvtaepel09DOmZKMxzJUu3ku1pYez-NMlbf2VRKlaUhoCzpsQAvD_BwE
  3. Sterile Processing Technical Manual – Healthcare Sterile Processing Association (myhspa.org)

Medical Supplier Pandemic Economics: Impact to Sterile Processing Department

by Dan Gusanders, founder and CEO of Pure Processing


Medical suppliers are facing many industry challenges in today’s climate with trickledown impacts to healthcare. We’ve outlined six of the top challenges to help you better understand what’s happening in the industry. By understanding these issues, you can better prepare your department for the impacts to your normal processes and inventory.


These challenges may seep into your daily life at the hospital. You are likely seeing it with price increases, product shortages, longer lead times, and staff shortages. Many of these problems were caused by the 2020 Coronavirus pandemic and have dramatically impacted businesses.


1. Pandemic shutdown and sterile processing

Many companies stopped purchasing materials, furloughed or laid off employees, and stopped producing goods in anticipation of the economy coming to a screeching halt. The shutdown of elective surgeries is one prime example of this disruption. Drastic reductions in surgical procedures caused many suppliers to slow production because of demand.  Sterile processing departments were simply not purchasing the same amounts of chemicals, brushes, or biologicals, and certainly not capital equipment investments.


And yet, in many sectors demand did not subside. In fact, it increased. That caused major supply shortages. There simply were not enough medical masks, disinfectant wipes, alcohol hand rinse, soap, plastic dispensing systems, or even plastic containers. Many of these products were not only consumed by the US, but in fact, by the entire world, in all industries, and even individual households. Areas outside of healthcare that were profoundly hit by shortages were bicycles, cars, boats, hot tubs, and pools, to name a few.


2. Just in time (JIT) inventory impacts

You have heard of it, and are likely living it to some extent at your hospital: We are in the midst of a JIT economy. Many hospitals and companies have learned the value of JIT production. You’re not tying up cash when you run lean.


That created a situation for all of us. Many companies had to throw out the lean initiative and bring in much more inventory than JIT. Pure Processing tripled up, and brought in six times more than what we usually house on some items to support our customers.


That cascade leads us to our next subject, the bullwhip effect.


3. The bullwhip effect on supply chain

The bullwhip effect is a supply chain phenomenon describing how small fluctuations in demand can cause progressively larger fluctuations in demand at the wholesale, distributor, manufacturer, and raw material supplier levels.


The “effect” is named after the physics involved in cracking a “whip.” The bullwhip effect had a profound impact on supply chains. Disinfectant wipes are a great example. Wipes were incredibly tough to secure for about five months. Everyone was on allocation but still going to other manufacturers to get more. That created hoarding scenarios which accelerated the volatile whip. While most disinfectant formulas were manufactured in the US, many plastic containers and wipes themselves came from China. Transportation, logistics, and border shutdowns further magnified the challenges.


4. Higher shipping and transportation costs

Higher shipping costs were sparked by a combination of factors, including soaring demand amid stimulus checks, saturated ports, a shortage of ships, and fewer dockworkers and truckers. The problems remain too broad to be remedied by any short-term fix and have created ripple effects across US supply chains.


Making matters even more challenging, the transportation industry saw a mass exodus of truck drivers and port personnel who had little intention of returning to work. Sound familiar, sterile processing friends?


Magnify these effects by including the beached ship in the Suez Canal, or the Texas ice storm (events that in normal environments would have little impact), and it became a triple threat.


5. Commodity production impact to tables and sinks

A commodity is a raw material used in the production process to manufacture finished goods. Over the last year, certain commodity production came to a halt, or was greatly reduced. But demand did not drop. That created a vacuum that sucked out the limited supply of important commodities such as lumber, copper, and stainless steel.


While hospitals and medical companies were deemed essential businesses, not all commodity producers were designated as such. Many producers where forecasting limited-to-no demand, and made major production cuts. As we know, when supply is gone and demand is up, prices escalate dramatically until supply and demand levels off. That explains why many of the items being purchased are rapidly increasing in cost.


Some  products seeing significant cost increases involve stainless steel. Think of all the products you use in the operating room and sterile processing that include stainless steel components; it becomes clear how integral stainless steel is to the operation of a single surgical procedure. Current administrations claim that the drastic cost increase in commodities is transitory. Many hope it is true.


6. Hoarding of critical reprocessing supplies: steel, gloves and other supplies

Can I just say, “toilet paper?” Or in your case at the hospital, disinfectant wipes.


At Pure Processing, we had to bring in larger amounts of lifting columns we use to build our height adjustable tables and sinks. We brought in three times over our normal supply, as our manufacturing lead times were significantly increasing (due to all the above). In other areas we “stocked up” on stainless steel, plastics, electrical components and decontamination gloves. JIT strategy out the door!


The road to recovery

This has been an incredible experience navigating the cascading impact of the pandemic. In fact, this may be a year of one of the steepest learning curves we have experienced, which believe it or not, we are thankful for!


Hopefully, we begin to see improvements as medical device suppliers start to experience a return to normalcy and the reduction of these six impacts mentioned above. We all want to get back to the business of supporting our healthcare partners improve outcomes for patients.

steel production chart

Source:


3 considerations when designing decontamination spaces

When designing decontamination spaces in SPD, staff safety, compliance to standards and guidelines, and minimizing cross-contamination are critical elements to determine an appropriate workflow.


ANSI/AAMI ST79:2017, 3.2.1.1 states “the physical design of the sterile processing department/area should support safe patient care, workplace safety, and security.”1 Additionally, workflow patterns should take into account methods to improve efficiency.


When designing a decontamination area, central sterile processing departments need to consider three design elements:

  1. Location of the decontamination area
  2. Manual cleaning equipment requirements
  3. Staff safety


1. Location of the decontamination area

ANSI/AAMI ST79:2017, 3.3.6 states that “the decontamination room should be physically separate from all other processing areas and from areas in which clean or sterilization procedures are carried out, with any connecting doors and pass-through windows remaining closed.” It should also be accessible from a “service corridor” and have “a door providing access to the clean workroom,” or a pass-through window for instruments that have been manually decontaminated.


The design of the decontamination room must consider that airborne contamination is high in the decontamination area. When instruments are being cleaned, aerosols are often produced that can pass indiscriminately to environmental surfaces, other instruments or staff. Enclosing the decontamination area is necessary to prevent contamination into the “clean” areas by air and surface transport.


2. Manual cleaning equipment requirements

Healthcare reprocessing sinks should have three sections or basins that are approximately 36 inches high and 8 to 10 inches deep. The sinks should include solid countertops or work surfaces in which technicians can place soiled and clean instruments separately. The basins should be large enough to allow instrument trays or baskets to be placed flat for manual cleaning. There should be two sink basins dedicated to soaking and rinsing prior to manual cleaning.


3.3.6.1.1 also recommends fixtures to prevent the accumulation of dust or soil. When reprocessing sinks utilize angled backsplashes, basin wrist rests, and basin marine edges, dust and liquids are not allowed to accumulate and also pull those contaminated liquids away from technicians.


3. Staff safety

Ergonomic considerations are also important when designing decontamination spaces to provide safety and comfort to your most important asset: your staff. ANSI/AAMI ST79: 2017, 3.3.6.1.3 states that decontamination spaces should include: Adjustable… sinks… positioned at heights that take into account the average height of the employees and the tasks to be performed… And anti-fatigue mats, constructed of materials capable of withstanding frequent cleaning, in areas where prolonged standing is required. By considering the needs of your staff during the design phase, departments can help prevent worker injury while also improving employee satisfaction. When staff are able to work comfortably and without pain, they are more likely to pay greater attention to manual cleaning tasks, in turn, improving patient safety.

Height-adjustable reprocessing sinks are also ‘future-proof’ against high turnover. Stationary or non-adjustable sinks can be a quick fix for the average height of a department’s technician today but can become obsolete when a department has turned over its employee base in 3-5 years.

By considering location of the decontamination area, manual cleaning equipment requirements, and staff safety, design of decontamination areas will be safer, efficient, and equipment will be easier to maintain.


Learn about Puresteel Healthcare Reprocessing Sinks and how the sink design meets compliance to effectively and efficiently manually clean surgical instruments. GelPro Eco-Pro NewLife Anti-Fatigue Mats also meet ergonomic compliance while helping staff maintain energy throughout their shifts.


References

  1. Association For The Advancement Of Medical Instrumentation. Sterilization Standards Committee, Association For The Advancement Of Medical Instrumentation, & American National Standards Institute. (2017). Comprehensive guide to steam sterilization and sterility assurance in health care facilities. Arlington, Va: Association For The Advancement Of Medical Instrumentation.


Can You Count On Syringes for Effective Surgical Instrument Cleaning?

Syringes are a common flushing solution to remove bioburden from lumened or cannulated surgical instruments. They are still used by reprocessing departments today, despite newer solutions being available. It’s time to take a deeper look at syringe flushing issues if you’re one of those departments.

Evaluate syringe flushing practices

You’re likely aware of syringe shortcomings if your instrument reprocessing department uses them to flush bioburden from instruments. You may have delayed a change in favor of other priority projects. But it’s time to reprioritize this issue.

Consistent, standardized instrument flushing according to guidelines reduces the likelihood of healthcare-associated infections (HAIs). We can all agree that’s important, not only for patients, but for clinicians and healthcare facilities as well. And the simple fact is syringes miss the mark. 34% of surgical site infections (SSIs) derive from inadequate cleaning before sterilization.1 Effective surgical instrument cleaning should be a priority to reduce that number.

It’s time to evaluate your departmental syringe flushing practices for efficiency and accuracy. You’re likely to discover the following issues.


Inconsistent flushing practices

Manual cleaning compliance is critical to reducing the likelihood of a surgical site infection. It would be ideal if everyone could flush exactly the same. But the reality is no two technicians or nurses do so. That leads to inconsistent syringe flushing, which does not meet surgical instrument cleaning IFUs. IFUs cannot be met if technicians flush differently from each other, or if technicians flush differently throughout their shift.

Cleaning surgical instruments takes more time

Syringes can only flush one instrument at a time. Newer options enable technicians to clean multiple devices at once, and even engage with other tasks such as brushing complex pieces on devices or preparing the next tray for cleaning.

It has also been the case, that surgical instrumentation has become more complex and detailed in recent years. Certain surgical specialties will have instrumentation with multiple ports, or surgical cases will increase the number of instrumentation per case. This makes the demand on nurses and technicians more significant and keeping up with case carts more strenuous.

Repetitive motion injury risk

Ergonomics is a key factor for technician success because repetitive motion injury can have lasting impacts for a sterile processing department and the entire team. Plunging and pulling 250mL can require as many as 10 syringe flushes. Imagine the impact to your technicians’ hands and wrists as they use 10 syringe fills to clean each instrument.

Loading and depressing a syringe repeatedly is not only uncomfortable, but also an exponential injury risk to your technicians over time. That can become a staff safety issue, or even a satisfaction concern.

Syringe waste impacts the environment

Most departments using syringes for flushing open a new syringe for each instrument (or have to take the time to disinfect the syringe between them). The excess use of syringes could add to landfill waste with potential negative impact on the environment. It’s also a consistent and unnecessary expense to the department.

Surgical instrument cleaning: A solution for syringe flushing issues

After evaluating your department for these four syringe issues, you’ll likely wonder how to overcome them. The good news? There is a simple solution that can solve them all.

The FlexiPump™ Independent Flushing System was designed to flush internal instrument channels hands-free, and meet manufacturer’s IFU as well as standards and guidelines. It resolves the above four syringe shortcomings in the following ways:

  • Consistent internal device channel and lumen flushing during manual and pre-cleaning to meet IFUs
  • Can flush up to three instruments at once for efficiency and throughput
  • Eliminates repetitive motions associated with syringes
  • Is a reusable device that eliminates syringe waste

Central Sterile Manager Matt discovered switching from syringes to the FlexiPump made manual cleaning easier. “It made decontamination for canulated instruments a lot easier for not just the [robotic instrumentation], but for everything.” He also found it made things a lot easier for the staff overall.

Every sterile processing department strives to meet standards, ensure the safety of reusable medical devices, and increase safety for patients. Flushing surgical instruments with syringes in past years was an acceptable practice. But recent improvements are available to help you meet all those goals you strive for, including staff safety and satisfaction.

It’s time to take a deeper look at syringe flushing issues. You just can’t count on syringes for effective surgical instrument cleaning anymore.


Learn more about the Pure Processing FlexiPump Independent Flushing System and how it can ensure your surgical devices are cleaned according to IFUs, save your team valuable time, and reduce the risk of repetitive motion injury.


References:

  1. Emergency Care Research Institute. If it’s not clean, it’s not sterile: Reprocessing contaminated instruments (2017). Retrieved May 25, 2021 from the www.ECRI.org website. https://www.ecri.org/components/PSOCore/Pages/e-lert041117.aspx


3 Reasons to Flush Medical Instruments Before Using an Ultrasonic Cleaner

One of the most important phases of medical device reprocessing is the manual cleaning. Improperly cleaned surgical instruments are much more likely to contribute to healthcare-associated infections (HAIs) if bioburden is not completely removed prior to the sterilization process. There are many options for cleaning such devices, including ultrasonic cleaners. But can ultrasonics perform an ideal cleaning on their own?


Ultrasonic cleaners can be especially effective at cleaning difficult-to-clean medical device instruments, and their hard-to-reach areas such as joints, crevices, and box locks. While their cleaning abilities may be useful, they do not perform the crucial first steps needed for proper manual cleaning. Those include flushing and brushing.


Here are three important reasons to properly flush and brush instruments prior to use of an ultrasonic cleaner.


1. Ultrasonics do not replace manual cleaning


Manual cleaning is a key step in the overall cleaning process. But ultrasonic cleaners on their own were not intended to remove all bioburden from devices.


HSPA recommends manual cleaning in conjunction with sonic cleaning (if the department is using an ultrasonic cleaning device). Doing so can “enhance the cleaning process and increase the bactericidal effectiveness of the disinfection and sterilization processes.”1


It may seem easy enough to brush devices thoroughly and then use the ultrasonic cleaner. Unfortunately, that doesn’t work.  Brushing alone before ultrasonic cleaning is not enough. While brushes introduce friction into the manual cleaning process, they do not introduce

cleaning chemistries into channels effectively, and do not rinse out residual bioburden. Flushing and brushing may be required cleaning activities prior to your ultrasonic cleaning process per device IFU.


2. Irrigating channels benefits from a flush before ultrasonic cleaning


As mentioned above, combining the manual cleaning efforts of flushing and brushing with an ultrasonic cleaner can enhance the sterilization process. That enhanced sterilization process occurs when the dual cleaning efforts maximize effective removal of bioburden from difficult-to-clean devices. HSPA recommends all lumens be carefully brushed and flushed prior to sonic cleaning.1


Following recommended device IFUs guidelines for flushing prior to sonic cleaning includes the use of proper time, volume, and pressure requirements. Pre-cleaning (or pre-conditioning) using proper flushing can also save time with independent flushing systems such as the FlexiPump, which can flush up to three devices at once and does not require a technician to monitor the PSI.


3. Ultrasonic cleaner IFUs require manual removal of bioburden


Manual cleaning to remove gross debris prior to ultrasonic cleaning is also recommended in the IFU of ultrasonic cleaners on the market. That is because ultrasonics were not meant to replace the manual cleaning effectiveness of flushing and brushing. The CDC reports, “Failure to adequately clean instruments results in higher bioburden, protein load, and salt concentration. These will decrease sterilization efficacy.”2


Ultimately cleaning goals should include:3

  • Removal of visible debris
  • Removal of invisible soilage
  • Elimination of as many microorganisms as possible


Proper flushing prior to ultrasonic cleaning can achieve those goals. Removal of overt residue makes ultrasonic cleaning more effective, which is why sonic cleaner IFUs require it.


Flushing during manual cleaning meets IFUs, cleans more effectively, and lowers infection risk


Ultrasonic cleaners can be an important tool when it comes to effective device and instrument cleaning. Yet it is important to remember their cleaning capabilities alone are not enough to remove all bioburden.


Flushing your devices first meets ultrasonic cleaner IFU, as well as device IFU. Proper flushing also makes your ultrasonic work more effectively, which ultimately contributes to lowered HAI risks to patients.


Those are all beneficial impacts of flushing prior to using your ultrasonic cleaner.


How do you perform manual cleaning tasks before using an ultrasonic cleaner? Tell us in the comments below!


Learn more about the Pure Processing FlexiPump Independent Flushing System and how it can support effective cleaning in conjunction with ultrasonic cleaning devices.


References

  1. Griffin, Ava and Concu, Patti (2017). Basics of ultrasonic cleaning. HSPA CRST Self-Study Lesson Plan. Retrieved May 30, 2021 from CRCST153.pdf (purdue.edu)
  2. Centers for Disease Control and Infection (2016). Infection control. Guideline for Disinfection and Sterilization in Healthcare Facilities. Retrieved May 30, 2021 from the CDC website. https://www.cdc.gov/infectioncontrol/guidelines/disinfection/tables/table10.html
  3. Pennsylvania Patient Safety Authority (2006). Patient safety advisory: Bioburden on surgical instruments. National Library of Medicine website. https://collections.nlm.nih.gov/master/borndig/101727488/200603_20.pdf

Two Reasons Following IFUs is a Necessity

Reusable medical devices can present a host of opportunities for hospital acquired infections (HAIs) or surgical site infections (SSIs). One critical area in which the risk for HAIs and SSIs must be reduced involves following manufacturers’ instructions for use (IFU) during the decontamination and sterilization processes.


The complexity of instruments that central sterile processing departments are charged with cleaning, is changing and evolving. From laparoscopic instruments with small hinges and lumens to rigid and flexible scopes with delicate channels, these instruments require specific steps to ensure that they are properly cleaned and sterilized. Without doing so, the risk to patient and staff safety increases exponentially.


flushing roboticsIFUs are “written recommendations provided by the manufacturer that provide instructions for operation and safe and effective use of its device. …The device manufacturer is responsible for ensuring that the device can be effectively cleaned and sterilized with the means and methods available in health care facilities. Sterilization validation of a device requires microbiological, engineering, toxicological, and sometimes clinical evaluations of the device, which are beyond the abilities of most health care facilities. To ensure patient safety, a reusable device needs to be capable of being thoroughly cleaned and sterilized. The device labeling describes specific methods of cleaning and sterilization that have been validated by the manufacturer.”[1]


Throughout the decontamination and sterilization process, ANSI/AAMI ST79: 2017 Comprehensive guide to steam sterilization and sterility assurance in health care facilities, requires that departments ensure effective decontamination and sterilization by following the device manufacturer’s written IFU.  To do so, IFUs should be easily accessible, reviewable, and followed. If no IFU exists for a device, instrument, equipment, or solution, the manufacturer should be contacted and a documented method of cleaning should be provided.


flushing ocular instruments
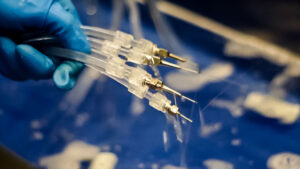
IFUs address several areas of concern. Many instruments or devices have numerous parts that must be disassembled for proper reprocessing. Understanding how those intricate parts work, the design elements, and possibly overlooked areas for cleaning, are essential to ensuring that a device is sterilized. Cleaning solution IFUs are another area that need to be taken into consideration. Proper dilution, concentration, temperature and contact time are vital for ensuring proper decontamination and sterilization. Additionally, some instruments and devices cannot be treated with specific solutions. Following manufacturers’ IFU will help prevent unnecessary damage the instrument. IFUs for reprocessing equipment are equally important. Without proper knowledge of the tools used to reprocess the instruments, effective reprocessing cannot be achieved.


While instrument damage and inventory protection is important, there are only two reasons why manufacturers’ IFU must be made available and followed:


  1. Patients: “IFU compliance is a must because we impact patients’ lives when the instruments used are contaminated. Patients come into the surgical suite with a medical problem that can be made better with surgery; the instruments used on that case must be processed following the IFU all in the name of patient safety.”[2]
  2. Staff: Your staff is your most valuable asset. Simply put, without central sterile processing staff, reusable medical devices would not get reprocessed. The risk of injury from equipment and instruments as well as exposure to harmful chemicals can be reduced by following IFUs. Departments cannot afford to lose their most valuable assets to often avoidable injuries.


Many tools exist for helping central sterile processing departments to ensure IFUs are followed. From digital databases that can be accessed through a computer at a workstation, to available hard copies of IFUs, departments must make sure IFUs are accessible to all staff. Training and in-servicing help to ensure that IFUs are followed, patient safety is not compromised, and that staff are able to safely perform their tasks.

[1] ANSI/AAMI ST79:2017, Definitions and Abbreviations

[2] https://www.infectioncontroltoday.com/view/importance-following-manufacturers-ifus

Integrating ergonomic tools to reduce injury and strain in packaging and assembly

Improve productivity, reduce staff injuries, and enhance patient safety with a few simple tools

Medical devices or instruments go through numerous reprocessing steps before they’re deemed sterilized. The packaging and assembly area of the sterile processing department (SPD) is critical in assuring “the sterility of an item” while protecting “the contents until use.” To assure sterility, personnel must follow standards and guidelines to make sure the packaged instrument will not pose risks to patients.


The rigorous requirements for preparation for sterilization in ANSI/AAMI ST79:2017 requires that “devices should be cleaned; dried; inspected for cleanliness, flaws, and damage; assembled; and packaged according to the manufacturer’s written IFU.”1  To do so, ANSI/AAMI ST79 states that “there should be sufficient space for clean textile storage (both before and after assembly into packs), an illuminated inspection table, and patching equipment. …the clean work area should include space for magnifying lights; processing tables, which should be made of nonporous materials (e.g., stainless steel), ergonomic, and, preferably, height-adjustable.”


The effects of packaging and assembly on the musculoskeletal system

The packaging and assembly process during medical device reprocessing is often very labor-intensive and can lead to musculoskeletal disorders (MSDs). Many times, departments have the best intentions when designing and establishing a packaging and assembly area, only to realize a few more options would have helped improve ergonomics and overall employee satisfaction.


back painMeet ergonomic compliance

ANSI/AAMI ST79 and OSHA ergonomic guidelines2 require height-adjustable workstations. Sterile processing trays are often extremely heavy. Bending and lifting trays onto workstations that are not at comfortable working levels can lead to musculoskeletal disorders. According to OSHA, MSDs “affect the muscles, nerves, blood vessels, ligaments and tendons. Workers in many different industries and occupations can be exposed to risk factors at work, such as lifting heavy items, bending, reaching overhead, pushing and pulling heavy loads, working in awkward body postures and performing the same or similar tasks repetitively. Exposure to these known risk factors for MSDs increases a worker’s risk of injury.”


The repetitive motion tasks that are also associated with packaging and assembly can lead to injury and strain. Did you know that ergonomic options go beyond making workstations height-adjustable?


Reduce injuries from repetitive tasks

ergonomic accessories
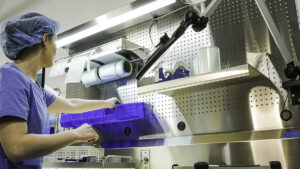
Keeping items easily within reach is key to reducing musculoskeletal disorders from repeated reaching. By employing an integrated pegboard wall, shelving, bins, peel pouch rolls and trays, tape dispensers and more can be designed with the user in mind. Pegboards allow items to be easily moved and adjusted to meet the end users physiological and workflow needs.


When it comes to workflow, “providing adequate space for supplies and equipment and designing the layout to facilitate the flow of work through the various steps of preparation contributes to the efficiency and accuracy of the sterile processing staff.”3


Meet lighting compliance

magnification light with instrumentIn 2013, researchers found that by integrating a few simple ergonomic changes into a department’s design can help improve staff safety. In one department, “a lack of space in the packing area,” led to “…undesirable twists when moving around equipment.”4 By leaving “enough space to establish safe and sound work processes,” the department’s workflow improved.


Another area in which prep and pack table design can benefit the end user is integrated lighting. ANSI/AAMI ST79: 2017, 3.3.5.6 states that “adequate lighting of work surfaces should be provided in accordance with the recommendations of the Illuminating Engineering Society of America (IES) for minimum levels of illumination…” The rationale is based on the “importance of speed or accuracy of the work done in the area (the greater the importance of speed or accuracy, the more illuminance needed).”


Upon completion of the cleaning process, staff must perform cleaning verification. “Cleaning verification by users should include (a) visual inspection combined with other verification methods that allow the assessment of both external surfaces and the inner housing and channels of medical devices…”


magnification light for inspection
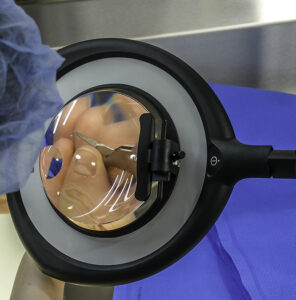
Many instruments have very small pieces and tips that look quite similar to the naked eye. It is even more difficult to notice these subtle differences under inadequate lighting. A 2019 study regarding errors in packaging surgical instruments found that “personnel error is the primary reason for packaging errors. Central sterile supply department (CSSD) staff members are not familiar with the clinical utilization of surgical instruments, and therefore it was hard for them to distinguish between instruments with minor differences.”5


To avoid errors in packaging surgical instruments, departments can meet compliance with magnifying task lighting. Magnifying task lights improve patient safety by enhancing visual inspection with direct light, as well as allowing technicians to verify cleaning processes and assess any damage to instruments prior to sterilization. Of equal importance, magnification and lighting improve staff safety by reducing eye and neck strain.


Find sterile wrap perforations without eye strain

packaging and assembly tabletop light
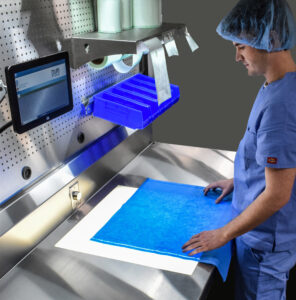
Additionally, when wrapping trays with woven and nonwoven sterile wraps, ANSI/AAMI ST79:2017, 9.5 states that departments must “inspect the wrap to ensure that it is free of defects that could have an adverse effect on the performance of the material.”


The International Association of Healthcare Central Service Materiel Management (IAHCSMM) recommends that visual “inspection is performed using a light table that has a light source built into the tabletop to help spot small holes and punctures. As the wrap is passed over the lighted table top, light shines through the small holes and punctures making them easier to identify.”6 By doing so, imperfections and perforations in sterile wrap materials can easily be identified and staff do not have to strain to find small holes.


Reduce medical costs while increasing productivity and patient and staff safety

In 2008, researchers sought to connect the costs of injuries and strains on a sterile processing department and in turn, design an intervention to alleviate the number of injuries and straining. The study found that in this particular department, “between 2001 and mid-year 2005, employees in the sterile processing center (SPC) experienced 32 injuries, costing $187,266.00 in direct medical costs (i.e., loss expenses), with strain injuries accounting for 94% of the total expenses and 50% of the total injuries.”7 Many departments are already backlogged with cases and need capacity boosting solutions. Adding injuries and strain to staff only creates further backlogs. By integrating ergonomic solutions in the packaging and assembly area, costs are reduced and throughput is increased. Not to mention, staff productivity and employee satisfaction are boosted as well.

Learn more about Pure Processing height-adjustable workstations and inspection tables to meet your workflow and workplace environment goals.

Want to earn 1 free CE? Watch Under Wraps: Packaging Materials, Their History, Efficacy and Creating Packaging Material Inspection Protocols


References


  1. Association For The Advancement Of Medical Instrumentation. Sterilization Standards Committee, Association For The Advancement Of Medical Instrumentation, & American National Standards Institute. (2017). Comprehensive guide to steam sterilization and sterility assurance in health care facilities. Arlington, Va: Association For The Advancement Of Medical Instrumentation.
  2. Ergonomics – Overview | Occupational Safety and Health Administration. (n.d.). Retrieved February 3, 2021, from www.osha.gov website: https://www.osha.gov/ergonomics
  3. Association For The Advancement Of Medical Instrumentation. Sterilization Standards Committee, Association For The Advancement Of Medical Instrumentation, & American National Standards Institute. (2017). Comprehensive guide to steam sterilization and sterility assurance in health care facilities. Arlington, Va: Association For The Advancement Of Medical Instrumentation.
  4. Hall-Andersen, L. B., & Broberg, O. (2014). Integrating ergonomics into engineering design: The role of objects. Applied Ergonomics, 45(3), 647–654. https://doi.org/10.1016/j.apergo.2013.09.002
  5. Zhu, X., Yuan, L., Li, T., & Cheng, P. (2019). Errors in packaging surgical instruments based on a surgical instrument tracking system: an observational study. BMC Health Services Research, 19(1). https://doi.org/10.1186/s12913-019-4007-3
  6. International Association Of Healthcare Central Service Material Management. (2016). Central Service Technical Manual. (p. ). : IAHCSMM.
  7. Boynton, T., & Darragh, A. R. (2008). Participatory ergonomics intervention in a sterile processing center: a case study. Work (Reading, Mass.), 31(1), 95–99. Retrieved from https://pubmed.ncbi.nlm.nih.gov/18820424/


5 Ways Healthcare Reprocessing Sinks Improve Workflow and Productivity

In central sterile processing and GI departments, the decontamination area’s reprocessing sinks represent the most critical area in ensuring that instruments are being properly cleaned. While commercial stainless steel sinks are commonly used for reprocessing medical instruments, not all sinks are created equally.

How healthcare reprocessing sinks are a better option than commercial stainless steel sinks

Manual cleaning and disinfection of instruments requires that sinks have either two- or three-basin sections1 to soak, rinse and provide a final rinse with critical water. The American National Standards Institute (ANSI) and Association for the Advancement of Medical Instrument (AAMI) standard ST79:2017 also recommends that sinks have “attached solid counters or adjacent work surfaces on which to place soiled and clean items separately.”

To make the most of the space available in the limited confines of the decontamination area, sinks need to also serve as a workstation. Unlike commercial stainless steel sinks, healthcare reprocessing sinks are designed with the decontamination tasks and users in mind. As such, ergonomics and workflow standards and recommendations are met.


5 ways healthcare reprocessing sinks improve productivity and quality

1. Ergonomics

Height-adjustable healthcare reprocessing sinks meet Occupational Safety and Health Act (OSHA)2 compliance and reduce musculoskeletal disorders. Central sterile processing personnel heights and physical capabilities vary, making height adjustability a necessity to perform duties optimally. Height-adjustability also comes in varying options. While the overall sink can be height-adjustable, having an attached pegboard or shelf under the sink that moves with the sink, also helps alleviate staff pain from bending and reaching by keeping tools within easy reach.

2. Protection from aerosolization

While personal protective equipment (PPE) is a necessity, sinks can also provide another way to ensure the reduction of aerosolization. Aerosols can make contact with personnel from any direction and can transfer microorganisms to personnel. The incorporation of a sink basin splash guard allows for personnel to be able to manually clean instruments without being exposed to dangerous organisms.

3. Workflow

Incorporating tools that ensure proper workflow allows healthcare reprocessing sinks to become a training tool. Workflow plates that indicate whether a particular basin is to be used for soaking, rinsing, or a final critical water rinse can be used as a training tool to educate new hires. It also serves as a reminder to veteran personnel when redundant, repetitive tasks can lead to overlook protocols. Workflow plates are also removable for easy cleaning.

4. Lighting

ANSI/AAMIST:79 requires adequate lighting of work surfaces.” Ancillary lighting should be considered for areas where instruments are manually cleaned and inspected.” Task lights with magnifying lenses allow personnel to be able to visually verify the cleaning process. Magnifying task lights can be installed on a pegboard with an adjustable arm that meets the ergonomic needs of each staff member for less eye strain and greater inspection capabilities.

5. Instrument protection

Tools such as staging panels and sink liners protect the tips of delicate, expensive instruments when more space is needed. By adding a staging panel to an existing sink basin, the sink’s built in counter space is expanded to help stage instruments prior to sterilization. Sink liners in basins and on sink countertops provide a soft-landing area to prevent damage to instruments while they are staged.


Learn more about Pure Processing healthcare reprocessing sinks, which feature moveable pegboard and shelving accessories to meet your workflow and workplace environment goals.

Looking for more sterile processing articles? Read Central Sterile Processing Education and Training Are Key to Reducing HAIs.


References:

  1. United States Department of Labor. Central supply. Occupational Safety and Health Administration.. https://www.osha.gov/SLTC/etools/hospital/central/central.html
  2. Association for the Advancement of Medical Instrumentation (2017). ANSI/AAMI ST79:2017, Comprehensive guide to steam sterilization and sterility assurance in healthcare facilities.